Every egress well we carry meets code, provides a secondary safe way out in case of emergency, and holds back heavy soil. From there, the choice comes down to a few things:
Start With What Sets Them Apart
- The look you want: white, galvanized steel, or decorative stone
- Egress ladders come in galvanized steel color, or you can choose black powder coating
- Your budget
Match the Well to Your Goal
- Steel wells: strong and budget-friendly, available galvanized or white
- Heavy-duty 16-gauge steel: for wider and deeper wells
- Stonewall wells: a decorative finish
Choose the Right Size
Your well has to be large enough to meet the egress requirements for your area (a minimum of 36” x 36”), and there must be at least 2” on either side of the window opening to prevent cracking the foundation wall when the well is attached. Also take into account your window type, as the space between an open crank-out window and the window well will likely be subtracted from the total egress opening during inspection. View our Measuring Guide or call our team, and we will walk you through it.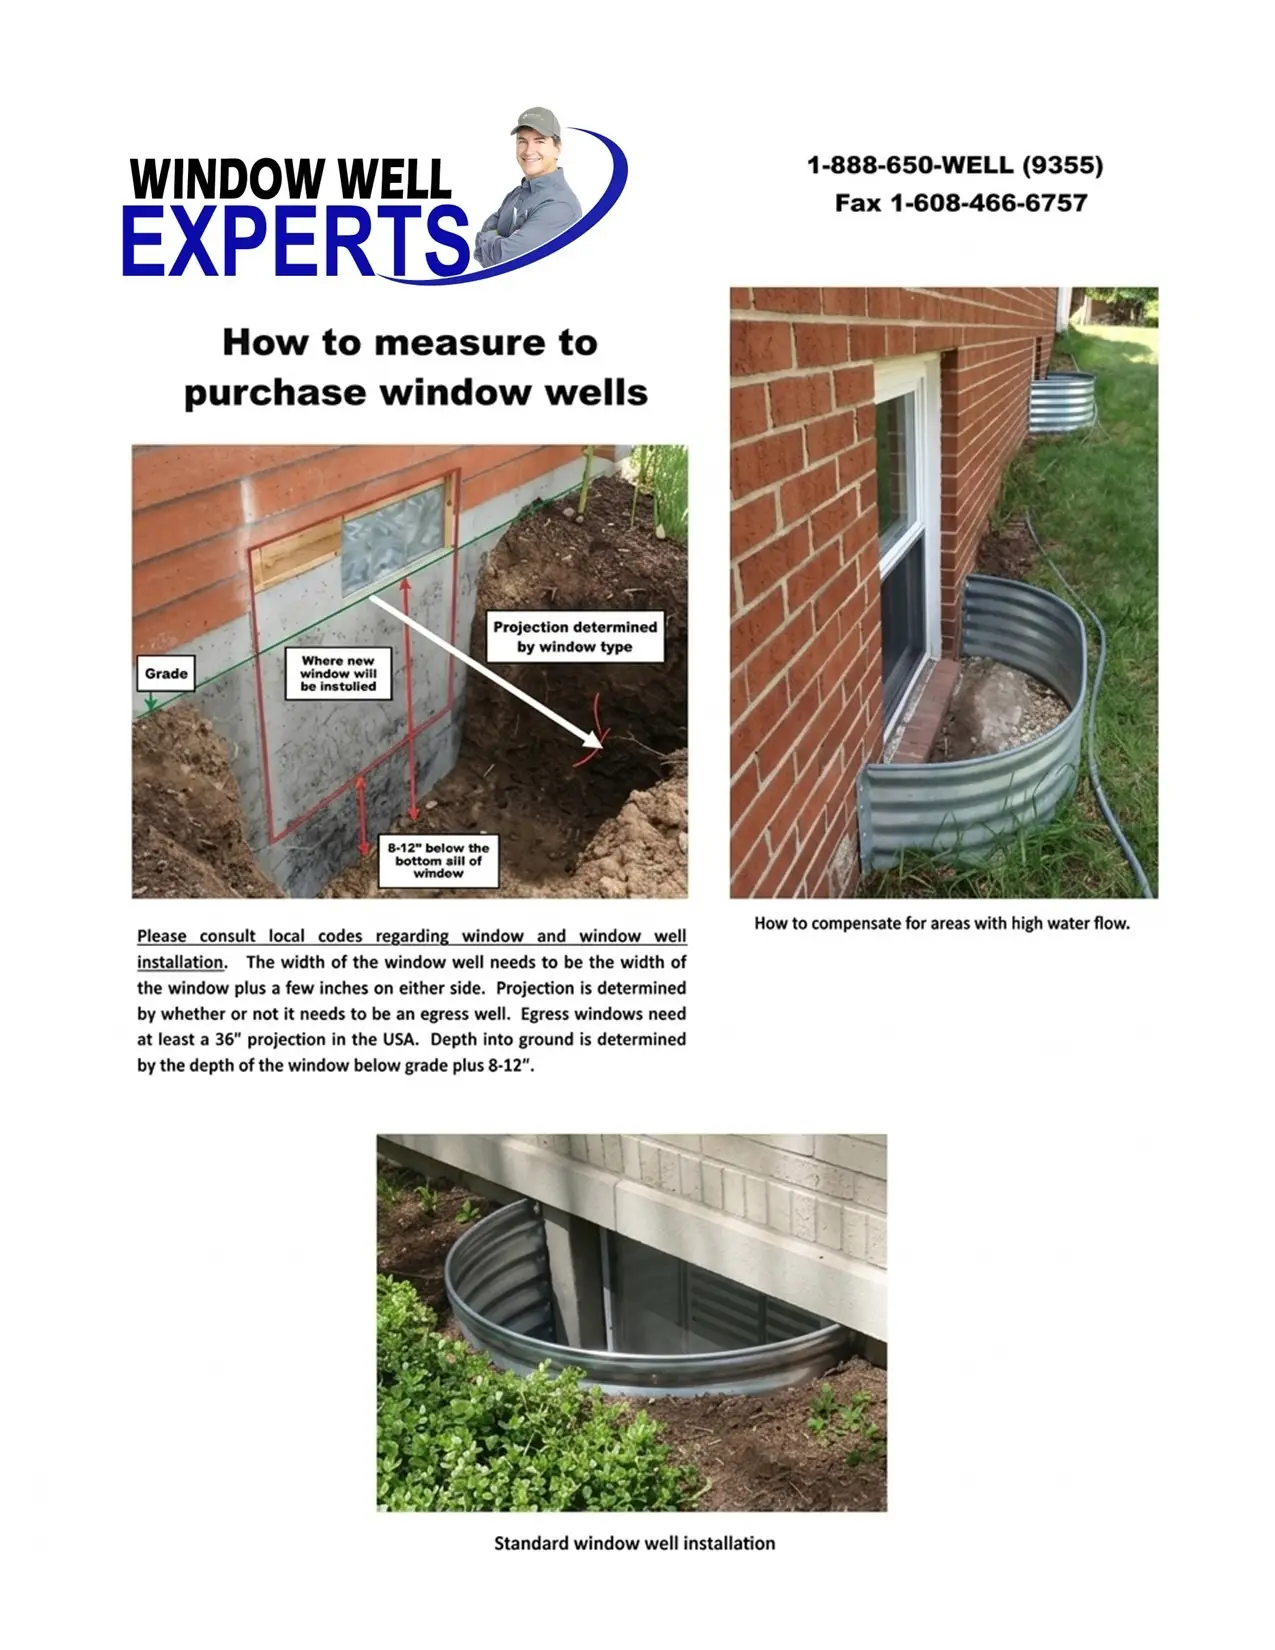
An egress well has to be big enough for a firefighter to enter the window well, with a minimum opening of 36” wide x 36” projection from the foundation wall. Window wells deeper than 44” from the floor or gravel of the well to the top lip must have a ladder attached to the well. Codes change by location, so browse the IRC codes and check your local building code before you order.
Most building codes require a permanently attached ladder or steps when the well is deeper than 44 inches, so a person can climb out without help.
Start with our Measuring Guide for step-by-step instructions.
- Always add 2-3” on either side of the window to determine the width of the well. This will prevent the concrete from cracking when the well is attached to the foundation wall.
- The projection of these wells is an egress-compliant 36”. The IRC code requirements for your state are listed here.
- The window well needs to be at least 8-12” deeper than the lower sill of the window and allow 3-4” above ground level. When the well is backfilled, the topsoil should be sloped away from the lip of the well so the rain will not run back into the well.
If you need help at any point, call our team, and we will go through the numbers with you at no charge.
Yes. Standing water in basement window wells can lead to water damage and leaks at the window. During installation, the bottom of the well should usually be filled with gravel and if available, tied into your drain tile system or sump pump so water has somewhere to go. Tying the well into your home’s drainage system keeps water moving away from the foundation and out of your lower level. A cover on top keeps out heavy rain and debris, which cuts down on water reaching the well in the first place.
Call your Local Diggers Hotline/One Call before digging.
You will need:
- Shovels—a regular spade is great, but you may want to consider a landscaper shovel. It has a narrow, longer blade that cuts through sod and heavy soils effectively.
- Metal file to sharpen the shovel occasionally.
- A mattock or pry bar if you have stony soil.
- A wheelbarrow and a tarp to put the soil on.
- Hammer drill with a masonry bit
- Tapcons, concrete & masonry sleeve fasteners, or wedge-type anchors (minimum 3/8” x 2”) with stainless steel fender washers for even pressure. On block or brick walls, consider wedge anchors over Tapcons for better grip.
Prepare the Site and Dig the Hole
Depending on your physical ability and soil type, you may choose to dig the well by hand or rent a mini-excavator.
Digging Guidelines:
- The hole should be at least 12 inches wider than the window well on all sides.
- The well should sit on firm, level ground and extend at least 3 inches above grade and at least 8 inches below the bottom window sill to prevent water entry.
- Protect your lawn and landscaping by laying down tarps for soil storage, and if you choose to use an excavator, place plywood under equipment to prevent ruts in your lawn.
If you ordered a cover, check the fit before mounting, as the side walls of the well can either bend out or toe in due to flexing during shipment. If the well is out of shape, attach one side of the well first and flex the well to make it symmetrical.
Mounting:
- Flanges should be attached to the foundation wall at 12” centers minimum to ensure structural stability.
- Drill holes using a masonry bit suited to the fasteners you chose. Remove all concrete dust.
- Apply a polyurethane caulk/sealant. (Make sure it is NOT self-leveling. It is too runny) Use concrete & masonry sleeve fasteners or wedge-type anchors, minimum size 3/8” x 2”.
- Connect window wells into the foundation drainage system if available.
- Fill the bottom of the well up to 2” below the lower sill of the window with decorative stone. Protect the window!
Backfilling:
- Maintain symmetrical tapering back to the wall on each side when backfilling the well. These precautions will ensure the proper fit of your cover.
- Place fill evenly around the window well in 12” layers using nonmechanical compaction to ensure the window well profile does not become distorted.
- Select a backfill that is free of large rock, soil clods, or frozen material—best practice is to use the soil removed from the hole.
- Inspect the area periodically, add more soil as it settles, and tamp it down firmly.